My child was reading simple, 3 letter words by the age of 2.5. But the age of 3, she could read simple sentences and soon, short stories.
By the age of 4, she was wolfing down books. We’d go to the library and come back with 40+ books that she would devour within a few days, begging for another trip to the library.
Where did this reading fluency at such a young age come from? And more importantly, how did I inculcate such a deep love for reading in my child?
This post contains affiliate links. If you click on a link I may earn a commission at no extra cost to you.
I am neither a school teacher, nor a certified reading instructor. I’m just a regular mom who wanted her child to develop a strong reading foundation so she could enjoy reading independently and confidently.
I honestly had no intention of teaching my child to read from such a young age. I didn’t even know that a 2.5 year old was capable of reading!
I stumbled upon Children Learning Reading totally by accident. I watched in jaw drop amazement as kids as young as 2 were sounding out words and reading sentences! I was totally amazed and wanted to see for myself if it actually works.
And much to my surprise, it did!
Within a few short weeks of using Children Learning Reading my child was actually reading words and soon sentences! You can check out my more detailed post where I give a review of Children Learning Reading and why I think its one of the best tools for parents to use to teach their kids how to read.
Also, you can watch videos over here of kids who have used this program: tiny little tots reading full sentences!
Now coming to this post… I’ve compiled a detailed, step by step action plan for you to follow. These are the exact steps that I followed when teaching my child how to read.
This post will be slightly long, but only because I have some amazing tips and strategies to share with you. Let’s get started.
10 Easy Steps To Teach Reading To Kids
Step #1: Pre – Reading Skills
Many parents in their eagerness to see their child read, completely ignore or skip over the toddler pre-reading skills.
These are skills a child must develop BEFORE they can begin learning to read. They form the basic foundation and stepping stone upon which your child’s reading skills are based.
It doesn’t matter if your child is in preschool, kindergarten or first grade.
It’s suuuuper important to make sure they’ve mastered these skills before they start learning to read. Many struggling readers are struggling precisely because they are being taught reading without having first learnt these basics.
You can read more in this post over here about pre-reading skills.
Here’s a basic summary of things you should be doing prior to officially teaching your child reading:
- read to your child every day
- let your child flip the pages
- keep a finger under the words as you read – this helps children understand that the words you are saying correspond with the words written on the book
- have engaging conversations with your child to help them build a strong vocabulary
- set up a cozy little reading corner in the house to help inculcate a love of reading
Step #2: Teach the Letter Names with the Sounds
A lot of well meaning parents start teaching their kids the ABC song. But they overlook teaching their kids the letter sound. This is a HUGE mistake.
The name of the letter and the sound that the letter makes are two different things.
It’s important to teach them both to your kids and ideally at the same time.
So this is what I want you to do:
Start off with a single letter and teach the letter name AND the letter sound.
It’s also important to teach them that each letter has a big version and a little version.
Write down the letter on a piece of paper – the capital letter and the small letter.
Then you’ll say something like this to your child while pointing to the letter A: “This is the letter A. This is the big “A” and this is the little “a”. And they both make the sound \\aaaaa\\”
Do the above with each letter with your child. Make sure to move to the next letter only once your child has mastered the previous letter. Make sure to keep revising previous letters as you move along to new alphabets.
While working on individual letters, I’d also encourage you to do activities related to that letter.
Here’s a simple activity that I used to do with my do with my 3 year old.
Every time we’d be working on a letter, we’d practice writing it down with colorful markers on a paper. Then, we’d think of fun words that begin with that letter. After that, my little one would draw the words that we thought of.
Here’s is an example:
My child wrote down the capital F. Then she wrote lots of small fs. Then she thought of words that begin with F such as fish, fly, fat and flower. Then she drew those things.
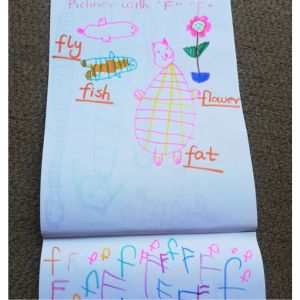
By including writing, drawing and coloring, you’re able to further reinforce the letter sound.
I’d also encourage you to do beginning sounds activities. These help children practice saying the words and identifying what the beginning sounds of each word are.
I have some amazing beginning sounds activity sheets that you can download, print and start using. Use the sign up box at the end of this post to get access to them!
Step #3: Teach Your Child Blending Using CVC Words
Okay so your child knows the letter names and sounds. Great! Now we’ll move onto blending. This is basically the little known secret to teaching your child how to read.
You want your child to understand that each word is made up of individual sounds (phonemes). So for example the word “cat” is made up of 3 sounds //cccc// //aaaa// and //ttt//.
Your goal is for your child to be able to sound out each individual sound and then string them together to make one single word.
Start off with three letter CVC words and practice blending them together with your child.
CVC words are those that have a consonant, vowel and then consonant. These are easy to read so always start off with these.
Example of CVC words are:
CAT, RAT, BED, FED, SAD, BAD, CAN, TAN, TIN, FIN, SUN
Write down on a piece of paper a CVC word for example “BAT”. Then put your finger inderneath B and say the sound ///bbb// , then put your finger underneath A and say //aaa// and then put your finger underneath T and say //ttt//. It’s important to sound out all 3 letters within one breath and not break it up.
Then slide your finger from B to A to T and say “BAT”
Have your child follow your lead.
Learning how to blend can take a while depending on each child. Some kids catch on to blending super fast. Others take a little longer. But honestly, all it takes is consistent practice.
Keep consistently practicing blending three letter words with them.
Once your child catches onto blending, learning how to read becomes a piece of cake for them.
One way that I made blending super fun for my child was to make it into this game that we’d play. Here’s how it would go:
I would write a CVC word on a piece of square paper “CAT”. Then I’d draw a funny looking cat on the flip side of the paper.
My child would sound out the letter sounds //cccc// //aaa// //tt// and then say cat. Then she would flip the paper to see the picture and see if she got it right.
Every time she got a word right, we would high five and then race from her room to the living room.
My child LOVED THIS GAME. Because it involved funny pictures drawn by mom, high fiving and racing, she thought it was the coolest game ever. She’d always be begging if we could play the game.
Sometimes I’d pretend I’m too tired and say I’m only going to be able to play for a little while. This made my little one even more eager to play.
Within a few weeks she was fluently reading 3 letter words thanks to this simple, silly game!
I’d really encourage you to find a blending game that YOUR child likes.
Another super important thing you can do to ensure that your child becomes amazing at blending is to play oral blending games.
Here is what I want you to do:
Say to your child: “Did you see the //cccc// //aaaaa// //ttt//
You took the word “cat” and sounded it out into individual sounds. Now let your child guess what you just said. The goal is for them is to guess that the sounds //cccc// //aaaaa// //ttt// make the word “cat”
You can do this with words throughout the day:
Can you look out the window and see the //ssss// //uuuu// ///nnnn// (sun)
Please hop into your //bb// //e// //ddd// (bed)
I can’t find your //ddd// //aaaaa// //ddd// anywhere
PS: please make sure you are sounding out the words correctly. If you’re unsure how to sound out words please look that up on Youtube and learn how to sound out words correctly.
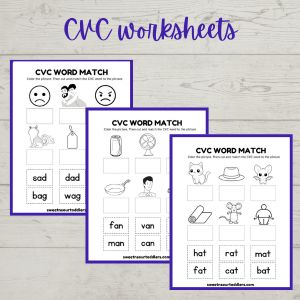
PPS: I have some amazing CVC words activity sheets that you can download, print and start using. Use the sign up box at the end of this post to get access to them!
Step 4: Use Word Families to Boost Reading Skills
Is your child struggling to catch on to blending? One reading strategy that really helps is to use word families. These are groups of words that have similar endings. At this stage, start off with 3 letter simple word families.
Just to give an example…if your child learns that the sounds //aaa// //tt// makes “AT” now they can easily read words such as “CAT, “MAT”, “FAT” etc et
I’m listing down some of the most simple word families. What you can do is focus on one word family at a time. Once your child is reading words in one word family you can confidently move on to the next.
“AT” makes words such as cat, mat, rat, fat, sat, bat, hat
“AN” makes words such as can ban, fan, ran, tan, man, van, pan
“AD” makes words such as mad, had, sad, lad, dad, pad, bad
“AG” makes words such as rag, sag, bag, tag, nag, wag
“ED” makes words like bed, red, wed, fed
“IN” makes words such as fin, tin, bin, pin, win
“IG” makes words such as pig, wig, fig, dig, big
“IP” makes words such as lip, hip, tip, sip, rip
“OP” makes words like hop, top, mop, flop, cop, pop
“UN” makes words like bun, run, fun, nun, gun,
“UT” makes words like gut, rut, hut, nut, jut, cut, but
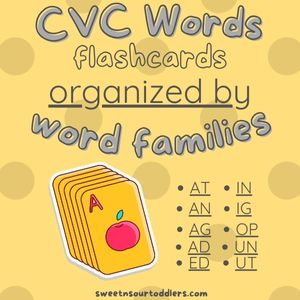
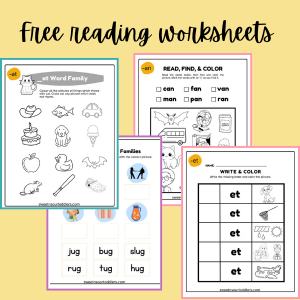
Make word families exciting for your child by doing word family activities with them! To make your life easier, I’ve taken all the above and created CVC words flashcards with engaging pictures I’ve also organised them into word families so you can pick a word family and practise one by one. Use the sign up box at the end of the post to get free access. You’re welcome!
Step 5: Introduce Sight Words
Okay so by now your child is reading 3 letter simple CVC words. That is absolutely amazing!
Now we’re going to move onto introducing sight words to your child.
Sight words are frequently used words that young children are encouraged to memorize by sight. This allows them to automatically recognize these words in print without needing to use any decoding strategies.
Examples of sight words include: the, them, he, she, they, we, is, be, and, said, or, go, so, me, to, I, was, all, are, for, has
Here is what I’d suggest: try to introduce 2-5 new sight words every week to your child. Start off with the ones I’ve given above. Keep consistently teaching new sight words every week. Teach sight words while simultaneously working on their blending skills.
High frequency sight words are easily available everywhere. There are also tons of ideas on Pinterest on the best ways to teach your child sight words.
I personally used the old fashioned flash cards method. I had sight word flash cards and my little one would practice learning 2-5 words per week.
You can use these sight word flashcards and make fun games out of them too to make it more interesting.
Step 6: Read Short Sentences and Stories With Meaning
By this stage, your child can confidently read 3 letter CVC words along with the top 20 high frequency sight words.
We’re now ready to introduce simple sentences. This is the really exciting part!
You’ll write down sentences that your child can easily decode. These should include simple 3 letter CVC words and the 20 sight words that your child has learnt.
Lucky for you, I already created these for you!
I took some CVC words along with the top 20 sight words and created simple sentences. I also created images to go with each sentence so that your child can associate meaning with what they just read.
The words that can be sounded out have dots beneath them and the sight words are highlighted in yellow.
If you’ve followed all the steps above, your child should be able to confidently read these sentences using their skills of blending, decoding and sight word memorization.
If they get stuck, don’t worry and remember to be patient. Help them sound out the letters, blend and practice their sight words depending on where they get stuck.
Congratulations! At this stage your child is reading and there is so much to celebrate! At this point, I want you to give your child tons of opportunities to read short stories. Make sure these are super simple stories that only include words that your child can easily sound out.
This is going to give your child such a confidence boost! When they see that they can read an entire story from beginning to end all by themselves they’ll feel so incredibly proud and eager to read even more.
When my child was at this stage of reading, I used to let her read to me rather than me reading to her.
She would feel so grown up!
Step 7: Introduce Digraphs
Now that your child is reading at a basic level, you can move on to more advanced reading. Introduce them to digraphs.
Don’t let the name scare you. Digraphs are basically two letters that combine together to form one sound. Examples include: “ch” “sh” “th” “ck” “ss” “ph” “wh”
Start by introducing 1 digraph at a time.
So you’ll do something like this: point to the letters “Ch’ and say that this makes the “chhh” sound. Have them practice saying this sound.
Then ask them to think of words that begin with “ch” such as “chips” “chick”
Then write down the words and help them use their blending skills to read the word. So “chips” would sound out like this: //ch// //iii// //pp// //sss//
Remember to stick to only those words that can easily be sounded out. Leave out complicated words that they can’t de-code at this point such as “chair” “chalk” “chain”
Once they can read these as words, start giving them sentences that include these digraphs.
So for example, now that they know words with “ch” you can give them sentences like this to read:
“Tom likes to munch on chips” (in this sentence: Tom, munch and chips can be sounded out while likes, to and on are sight words)
Step 8: Teach CVCe Words
Remember those complicated words we talked about? Your child is now ready to be introduced to CVCe words. These are basically words that have consonants, vowel, consonants and then an “E” at the end.
Our goal is to teach kids that this “E” at the end of the word is a silent, sneaky “E” that doesn’t get pronounced. But because of this “E” being there, the way the word is said changes. The vowel in the word changes from a “short vowel” sound to a “long vowel” sound.
The best way to show kids how this works is by showing the difference between simple CVC words and then comparing with CVCe words. For example:
TAP vs TAPE (the sound of the vowel A changes from //aaaa// to //ayyyy//)
BIT vs BITE (the sound of the vowel I changes fro //i// to //aeeee//)
NOT vs NOTE (the sound of the vowel O changes from //o// to //ohh//)
CUT vs CUTE (the sound of the vowel U changes from //u// to //uuooo//
To help your child not get overwhelmed, start off with CVCe words that have an A as the vowel such as bake, take, fade, shade, male, sale. Have them practice the long vowel sound that the A makes.
Once they master that, you can then slowly move on to the CVCe words with I,O and U in the middle and do the same for each of them.
To make things exciting, give them CVCe activities, games and fun worksheets to do!
Step 9: Teach R Controlled Vowels
Okay now we come to R controlled vowels. The goal is to teach kids that you have some words that have a very bossy R. This bossy R controls the sound, but it’s polite enough to let the vowel go first.
There are 3 r controlled vowel sounds.
The first has the letters “AR” (which makes the sound //aaarrrrr// like a pirate)
Examples of words include: cart, park, mark, farm, sharp
The second has the letters “OR” (which makes the sound //ore//)
Examples of words include: corn, short, port, sort
The third has the letter “IR” “ER” “UR” (which makes the sound //iirrrrr//)
Examples of words include: girl, stir, dirt, cover, water, hurt, curl
Like usual, its best to start with 1 R controlled vowel sound and then move on to the other two.
To make it fun, play exciting R controlled vowel games!
Step 10: Teach Vowel Teams
You’re at the last step of teaching your child how to read. It’s time to introduce them to vowel teams.
Vowel teams are basically two letters that come together to make a single sound.
These are the ones I want you to start with:
The letters AI/AY make the long vowel A sound (//ayyyyy//). Examples of words: pail, nail, tail, hay, say, day
The letters EE/EA make the long vowel E sound (//eeeee//). Examples of words: feel, feet, meat, heal,
The letters IE/IGH make the long vowel I sound (//aaaii/). Examples of words: tie, pie, lie, high, sigh, fight
The letters OE/OA make the long vowel O sound (//ohhh//). Examples of words: doe, foe, goes, boat, soap, roast, float
The letters UE/UI make the long vowel U sound (//uuu//). Examples of words: que, juice, suit, fruit, que, hue, argue
The way to teach these is to start with one vowel team for example take the letters “AY” and explain to them that when these two letters come together they make one sound //ayyyy//. Have them practice that sound and then practice decoding and reading words that have “AY” in them.
Now vowel teams can get confusing for kids so it’s important to take it slowly. The ones above are not the complete list but they are a great place to start.
Vowel teams take a while to master and requires tons of practice. So don’t be in a hurry at all.
And that’s it!
If you follow the 10 steps above, stay consistent, are patient and remember to make the whole thing FUN for your kids by doing lots of fun activities, I can promise you that your child will be reading with fluency and confidence!
Interested in all the fun, engaging reading activities that I’ve put together for you? Sign up below to get free access! I’ve organised these resources according to the 10 steps given above. That way, whichever stage of reading your child is at, you have some amazing worksheets and activities you can do with them to help reinforce the concept you are teaching.
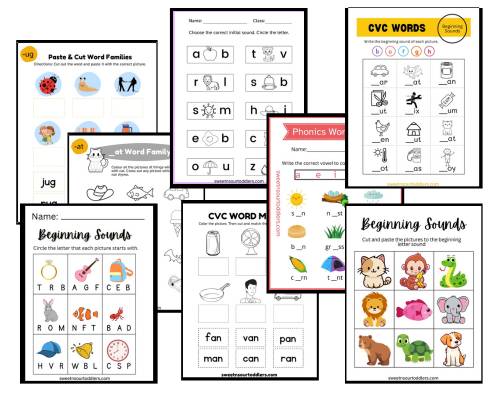
I’ll also share with you via email some more amazing tips and little known hacks for getting your child to become a fantastic reader.
Trying to teach reading at home and don’t know where to begin?
Building a strong reading foundation is one of the best gifts you can give to your child. You open up a whole world of books to them and give them the best possible start for their journey of learning.
As a busy parent, what I wanted was an easy, step by step guide on how I could teach my child to read without having to take out hours in the day.
I used the Children Learning Reading program and by spending 10 minutes a day, I saw some phenomenal results! By the age of 3, my daughter was fluently reading 3 to 4 word sentences and short stories.
She’s 5 now, reads at 3rd grade level and I literally need to ask her to come out of her reading corner!
If you’re interested, you can read my post on how I taught my child to read: what are the things that worked for us, what I learned from the whole process of teaching my child to read and what I’d recommend you to do.
Check out Children Learning Reading and see why 70,000 plus parents have used this reading program (with zero teaching experience) to see some incredible results!
We think you’ll enjoy reading these posts next:
7 Creative Ways to Teach a Toddler to Love Reading
5 Toddler Pre-Reading Skills and How to Inculcate Them
10 Inspiring Ideas For Setting Up An Insanely Cute Toddler Reading Corner
Children Learning Reading Review – An Honest Opinion From a Mom
Understanding and Teaching CVC Words: A Guide for Educators and Parents

Leave a Reply